How Can We Help?
Widget Basics
Homeschool Planet Widgets are small windows with mini apps that make daily tasks easier, more efficient, and definitely more fun! Whether you are tracking your grocery list and texting it to a family member on their way home from work, creating To Do lists for everyone in the family, or posting inspirational quotes to motivate you, we know that you will appreciate widgets and find them an essential part of your day!
Adding Widgets
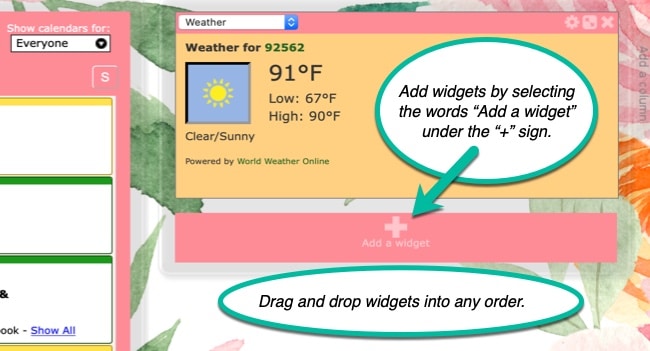
- Widgets can be added either across the bottom or down the right side of your calendar. Locations they can be added are indicated by a “+” sign and the words “Add a widget” within a box.
- Click on the “+” sign and a drop down box will appear.
- There are several types of widgets. Choose the one you wish to add~ Weather, To Do, Shopping List, Reading, Bible Verse, Daily Quote, Lookup, and Messages.
- Once you choose the widget you prefer enter the applicable information.
- Widgets can dragged and dropped into any order you prefer.

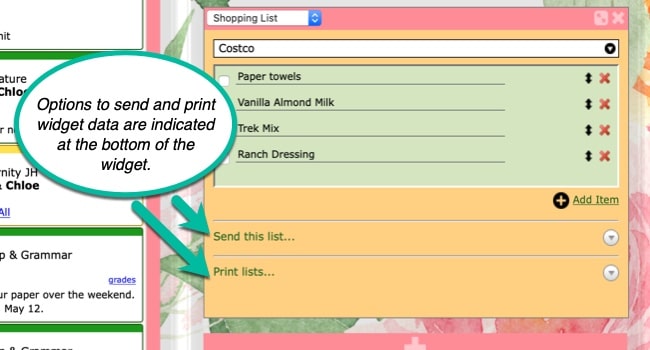
Sending Data from Widgets
When the data in a widget can be sent to someone you will see the words, “Send this list” or a send button within the widget. To utilize this function simply select the wording or the button and then choose who to send it to. The options for who data may be sent to will include any members who have logins within the account and have email addresses and/or cell phone numbers entered. Data may be sent to a single person or multiple people at once.
Not Home and Need Your List?
A favorite feature of both the To Do List and Shopping List Widgets is the ability the have Homeschool Planet text a list to you when you aren’t home. To activate this feature simply text “TODO” or “SHOP” to 234-319-9231 and your list will arrive via text!
Printing Data from Widgets
To print data and lists from within widgets choose the print button. A pop-up will appear allowing you to select what data from the widget which you wish to include. After making your selection choose print and then complete the action from your printer software.
Students and Widgets
When students have been granted access to login with their own account you can choose whether to allow them access to see and update widgets. To allow this access follow these steps.
- Select the picture of the student you wish to grant access to and then choose Edit <<Student’s Name>> Profile.
- Click on the Login tab on the left.
- Scroll to the bottom and place a check mark in the box that reads, “Allow <<Student’s Name>> to see and update widgets.
Once students have access they will be able to add and remove widgets from their profile as well as update the data in them. While students can have their own layout of widgets, the data is shared between accounts.
Widget Controls
- To hide a Widget select the “X” in the upper right hand corner of the widget. This will NOT delete the data in the widget but simply hide it until you select it again.
- The small box next to the “X” in the upper right hand corner of the widget will maximize the widget. This means it will make the widget much larger for ease in entering info. It can be toggled back to the smaller size by selecting the same box again.
- To add data use the Plus sign next too the words Add item.
- To delete data in a widget use the red X next to the item you wish to delete.
- Items can be dragged and dropped into a different order by using the double sided arrow next to an item.
Widget Basics Video Tutorial
As always, feel free to reach out to us with any questions at support@homeschoolplanet.com. We are here to help you!
Here are other User Guide entries all about Homeschool Planet Widgets:
- Daily Bible Verse Widget
- Daily Quote Widget
- Messages Widget
- Reading List Widget
- Shopping List Widget
- To Do List Widget
- Weather Widget
- Look-up Widget
Not a Subscriber yet? Check out Homeschool Planet for yourself with a 30-day FREE trial. No credit card information is necessary to give it a try!

With Homeschool Planet lesson plans, homeschooling has never been easier!