How Can We Help?
Student Logins and Passwords
Setting up your student’s login is a terrific time saver for older kids! And it is easy as can be! This is the article for you if you want to learn about how to create a student login and password. Even better, you control what they see, and what they can edit! Learn about this awesome feature below!

Setting Up a Student Login and Password
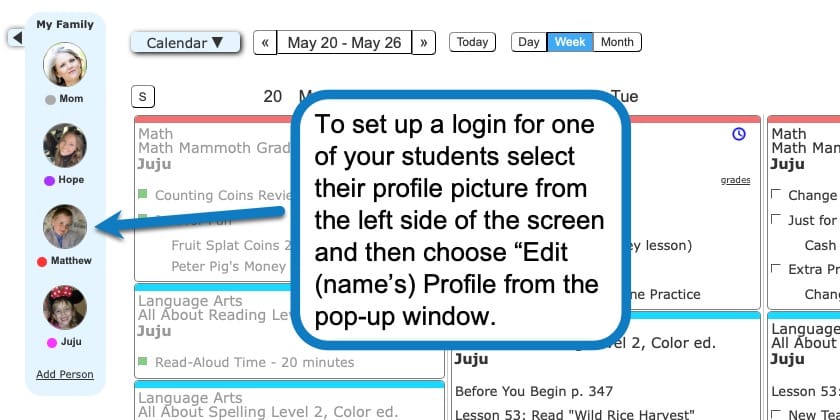
- After logging into your planner, locate and select your student’s icon in your family list on the left side of your planner. Then select the “Edit (name)’s Profile” text link at the top of the pop-up window.
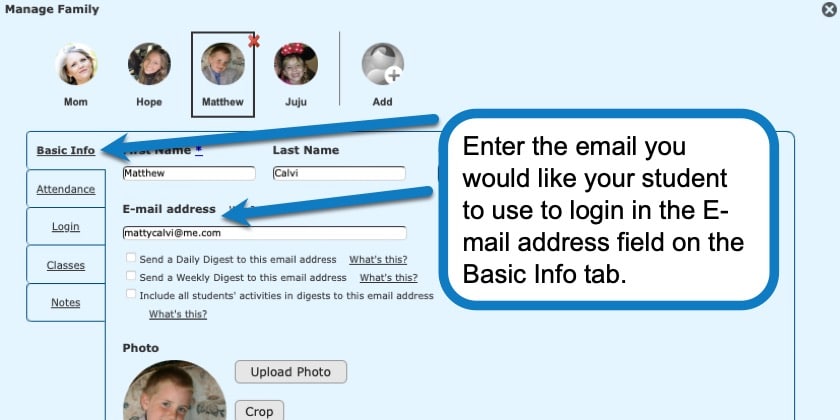
- On the “Basic Info” tab, check that there is an email address in the “E-mail address” field. You can use your student’s email address, or your own.
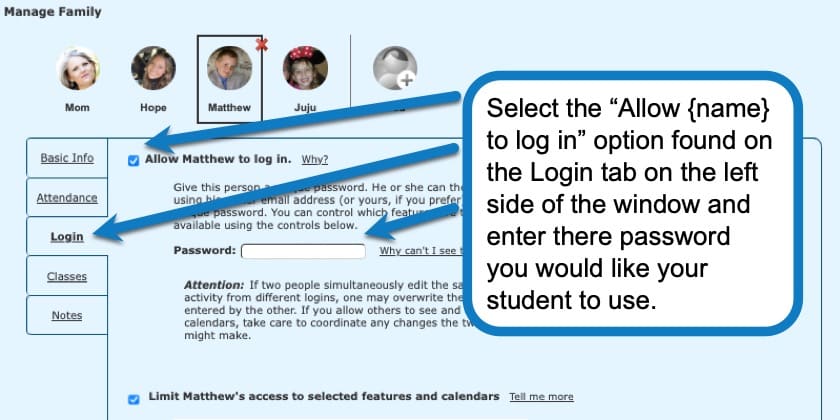
- Next, select the “Login” tab on the left side and check the “Allow (name) to log in.” box. New option fields will appear as well as some helpful information about the fields.
- Find the “Password” field and enter a password for your student.
~Note: You can enter any password you like- there are no limitations or special characters required here. You can change the password from this location at any time. If you have used your own email address your student’s login their password must be different from your own or the system will think you are the one logging in. - If you would like to limit your student’s access to specific features and calendars, check the “Limit (name)’s access to selected features and calendars” box.
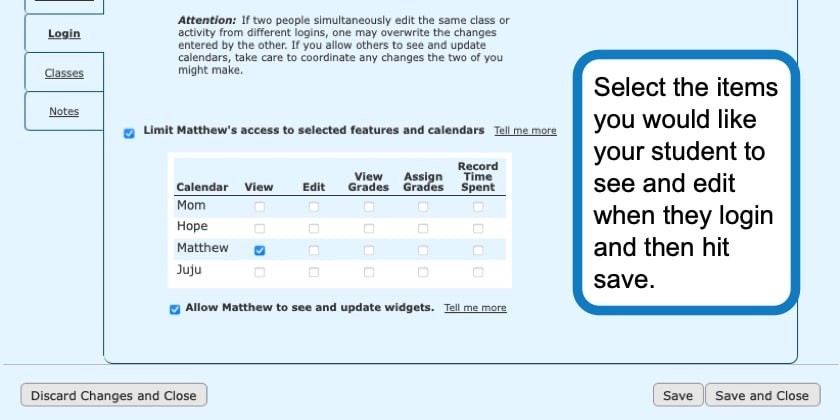
- In the chart that appears, you can choose which calendars and features your student has access to when they log in. Initially, students are allowed to only view their calendar and to mark assignments complete. However, you can allow them other privileges.
- Under the chart, you can check or un-check the box to “Allow (name) to see and update widgets,” depending on your preference.
Note: If you DO check the Limit Access box you will have the ability to choose which calendars the user can view and edit.- You will select individual permissions in each area for each person in the account.
- View means that the items can be seen but not edited.
- Edit means permission to edit or add classes and activities has been granted.
- View grades means that you can see entered grades for that account.
- Assign grades means that permission is granted to enter or edit grades.
- Record Time Spent gives permission to log hours for classes that have hours tracking set up.
- Any calendars which you have shared into your Homeschool Planet account will appear at the bottom of the list for you to make visible, or not, to them.
- Choose whether to allow your student to see and update widgets. While users with permission to see and update widgets can choose their own layout and add information be aware that all widgets in an account share the same data.
- When you are finished with your selections, click the “Save and Close” link.
- There are so many possibilities. Customize your account for the option that works best for you!
Student Login and Password Screenshots
Student Login and Password Video Tutorial
As always, feel free to reach out to us with any questions at support@homeschoolplanet.com. We are here to help you!
Not a Subscriber yet? Check out Homeschool Planet for yourself with a 30-day FREE trial. No credit card information is necessary to give it a try!

With Homeschool Planet lesson plans, homeschooling has never been easier!
![]()