How Can We Help?
Applying Lesson Plans
Planning your school year has never been easier than when you are applying Homeschool Planet’s plug-in lesson plans to your school calendar. Simply choose your students, a date range, which lessons to apply, and voila! Your whole class scheduled in minutes. For detailed instructions, see below.

Finding your purchased Lesson Plans
The first step to applying a Homeschool Planet plug-in lesson plan is finding it!
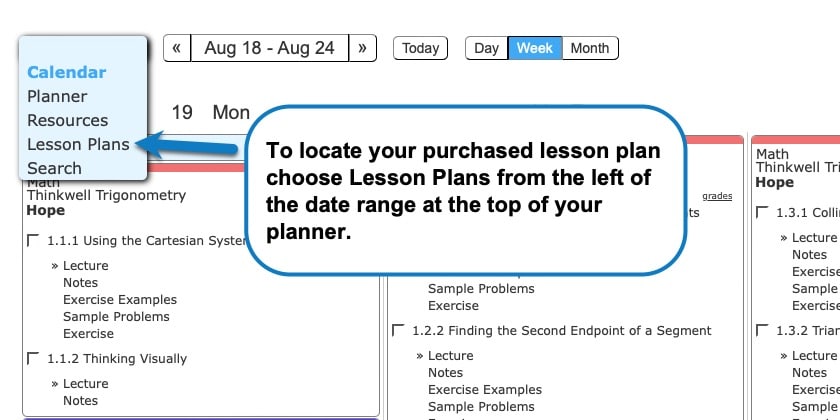
After logging into your account, all lesson plans are found in your Lesson Plan Library by clicking on the drop-down menu labeled “Calendar” in the upper right-hand side of your screen and choosing the “Lesson Plans” option.
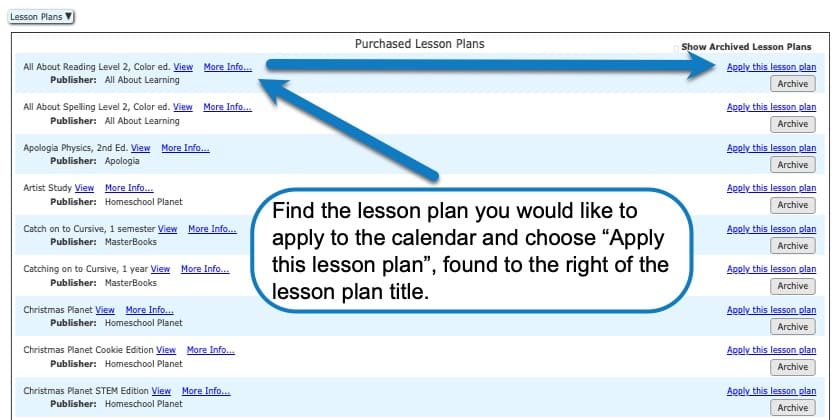
On this screen, you will see all your lesson plans listed in two sections, one for your “Purchased Lesson Plans” (those you have purchased from the Marketplace) and the other for “My Lesson Plans” (those that you have either created from a class or made from scratch).
Applying the lesson plan
- Locate the lesson plan that you would like to use, then select the “Apply this lesson plan” text link to the far right of the plan name.
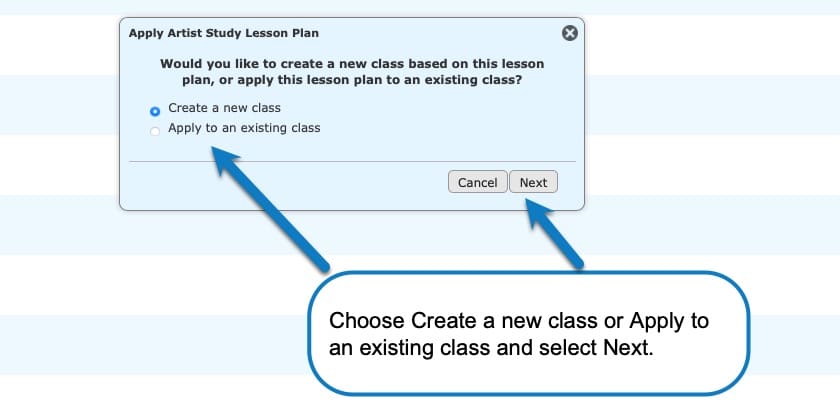
- When the “Apply (PLAN NAME) Lesson Plan” window opens, select either the “Create a new class” or “Apply to an existing class” option. Then click the “Next” button. Depending on which option you have selected, a different set of windows will open.
*If you select the “Create a new class” option:
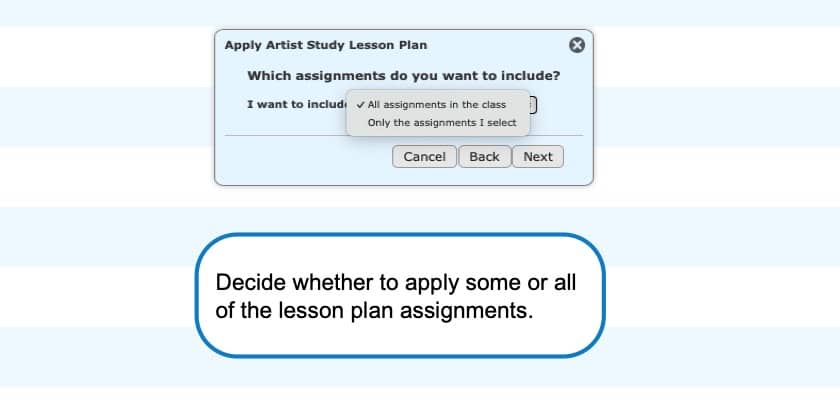
- The next window will ask “Which assignments do you want to include?”
- In the “I want to include:” field, select either the “All assignments in the lesson plan” or the “Only the assignments I select” option.
- If the “All assignments in the lesson plan” option is chosen, click the “Next” button.
- If the “Only the assignments I select” option is selected, a list of the plan’s assignments will appear. Select which assignments you want as well as if you would like to “include notes” when the plan is applied by checking or unchecking the boxes. When you are satisfied with your selections, click the “Next” button.
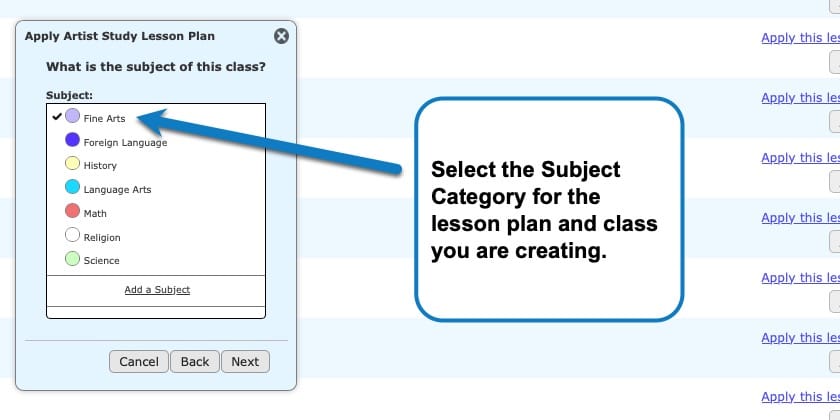
- The next window will prompt you to select the subject of the class. You can also select the “Add a Subject” text link at the bottom of the list to open the field for creating a new subject. Once you select a subject, the “Next” button will be available to click.
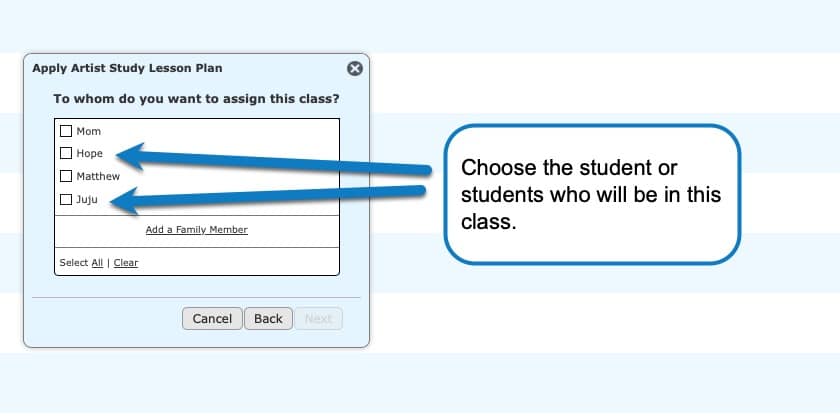
- In the next window, you will be asked “To whom do you want to assign this class?” Check the box(es) beside the appropriate student(s), and click the “Next” button.
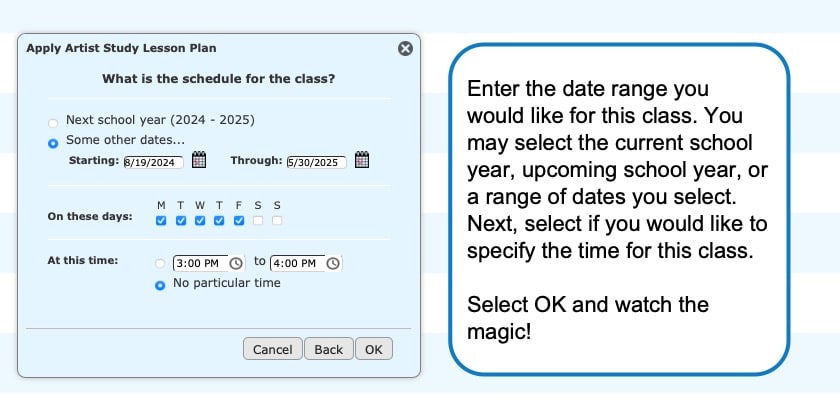
- The next window will ask “What is the schedule for the class?” Select the options that fit your needs, then click the “OK” button in the lower right of the window.
- A confirmation window will pop-up. Select the “OK” button and your lesson plan will now be applied to your planner.
*If you select the “Apply to existing class” option:
- The next window will ask you to “Choose the class to which to apply this lesson plan.” There is also a “Change which classes are listed here…” text link above the list that can be selected to open the “Select Classes” window. Here you can refine the classes list by student, subject/category, and time frame. Select the class you want the plan to be applied to then click the “Next” button.
- Continue by following all the steps above in the “If you select the “Create a new class” option:” section.
A few more things to note:
Purchased lesson plans from the Marketplace have a specific number of days and weeks recommended by the publisher.
If a lesson plan has already been applied to a class and you select the same class to apply the plan again, a pop-up window will appear asking “On what date do you want the assignments to start?” If you intend to apply the plan again, make your selection, click the “OK” button, and the plan will be applied without any further steps.
Grading and editing of plans can be done after they have been applied to your planner.
The screenshots below show each of these steps.
Screenshot Images
Applying a Lesson Plan Video Tutorial:
As always, feel free to reach out to us with any questions at support@homeschoolplanet.com. We are here to help you!
For more information about using Lesson Plans in your your Homeschool Planet account see the following entries:
- Lesson Plan or Class
- Applying a Partial Lesson Plan
- Creating a Lesson Plan from a Class
- Deleting a Lesson Plan
- Finding Purchased Lesson Plans
- Sharing Lesson Plans
- Purchasing Plug-In Lesson Plans
Not a Subscriber yet? Check out Homeschool Planet for yourself with a 30-day FREE trial. No credit card information is necessary to give it a try!

With Homeschool Planet lesson plans, homeschooling has never been easier!


