How Can We Help?
Creating Report Cards
Creating a Report Card in your Homeschool Planet account is as easy as clicking a few buttons since your classes are automatically imported for you! Every field is customizable so that you can reflect all the items you want and only the items you want. To get started creating a Report Card today follow the directions below.

Creating the Report Card
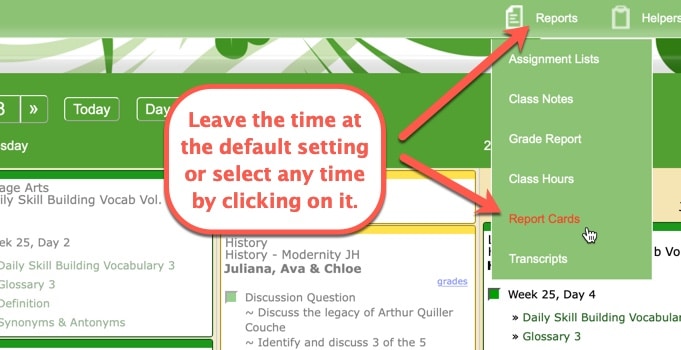
- Select “Reports” at the top of your screen and choose “Report Cards” from the drop-down menu.
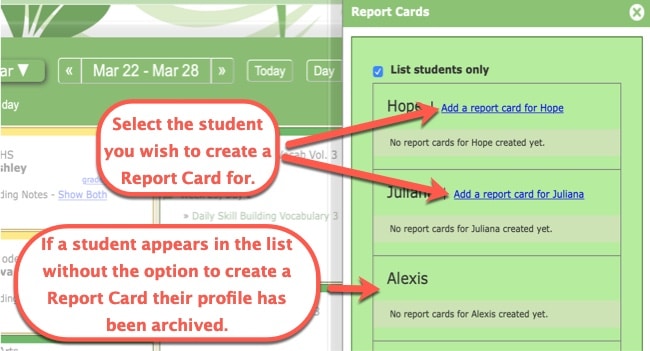
- Find the student’s name for which you wish to create a Report Card and click on the link “Add a report card for [student’s name].” The option to create a Report Card only appears for current students. If a student has been archived you will need to make their profile active again before creating a Report Card for them.
- Choose the school year you wish to make a Report Card for and then select “OK”.
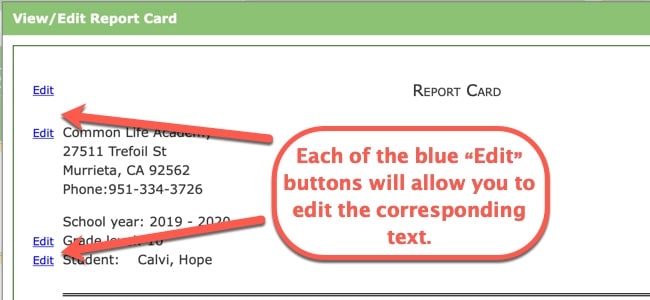
- Once the “View/Edit Report Card” popup window is displayed, you will begin with the top third of the Report Card which contains general information. You can click on the “Edit” link in each section to edit each box to fit your needs; choosing the title of your report card, entering your school name and address, editing the grade level, and even the student’s name.
- Next, in order to edit Class titles and Grades, begin by selecting the blue “Edit” next to the line reading Core Subjects.
* The classes listed should be all those your student is currently enrolled in which have grading enabled, for the selected school year.
* To delete a class from the Report Card simply choose the red “X” to the right of the entry.
* Your Report Card is divided into two grading sections by default~ Core Subjects and Elective Subjects. Classes follow the same settings you chose in the Settings> Subjects section at set-up. You may adjust any class to the opposite category by choosing the blue edit button next to the Core Subjects title. To make a subject a “Core” subject or not simply check or uncheck the box for that Class. If all classes are put in the same section (Core or Electives) only that section will appear on the Report Card.
* Adjust the name of any class by simply typing in the box where it is listed.
* The grade is automatically inserted from your Homeschool Planet records but may be changed by using the drop down boxes for each grading period.
* Additional Classes may be added using the “Add courses” button.
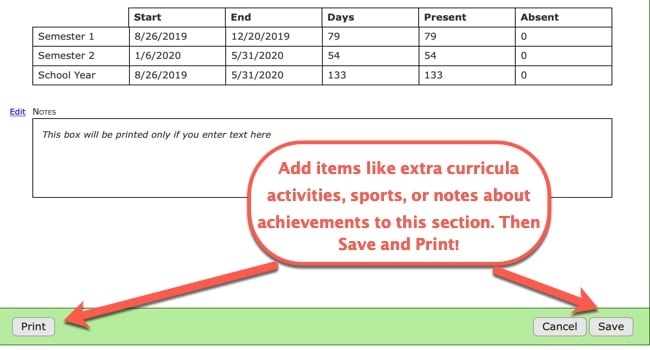
* When all changes to this section have been made select “Save” from the lower right hand corner. - The Notes section is for any extra info you would like to include on the Report Card. If there is no text within this section the box will not print.
- When all edits are complete hit the Save button in the lower right hand corner.
- To print your Report Card choose the Print button from the lower left hand corner.
That’s it! The screenshots below show each of these steps.
Screenshot Images


Report Card Video Tutorial
As always, feel free to reach out to us with any questions at support@homeschoolplanet.com. We are here to help you!
Not a Subscriber yet? Check out Homeschool Planet for yourself with a 30-day FREE trial. No credit card information is necessary to give it a try!
With Homeschool Planet lesson plans, homeschooling has never been easier!


