How Can We Help?
Adding a New User
Tracking your student’s activities, academics, chores, and events is no small feat in this age. Homeschool Planet helps you track all these pieces and more to help simplify and enhance your homeschooling journey. With individual logins available for each student, daily and/or weekly email notifications about upcoming events and assignments, and easy to access reports Homeschool Planet makes student management straightforward and simple to administer. To learn about adding students to your Homeschool Planet account follow the directions below.

Adding Students and Additional Users to Your Account
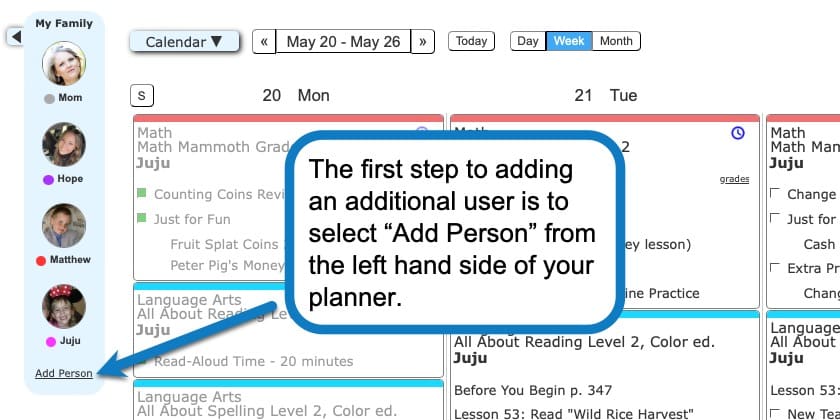
- First, click on the “Add Person” link under your picture on the left side of the screen. If you have already entered other students this link will be at the bottom of those students.
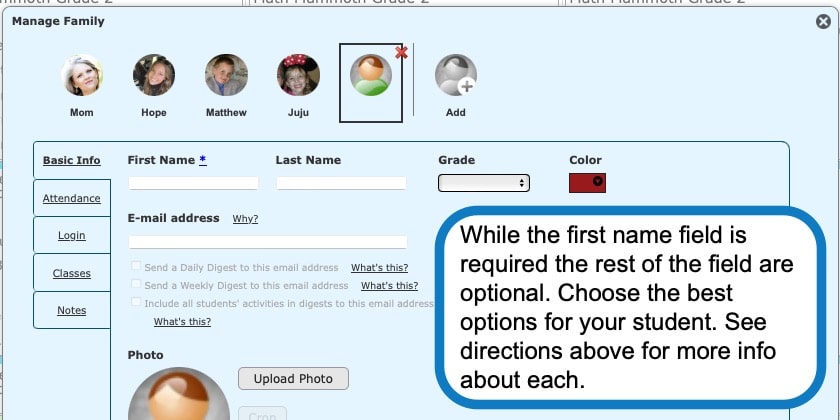
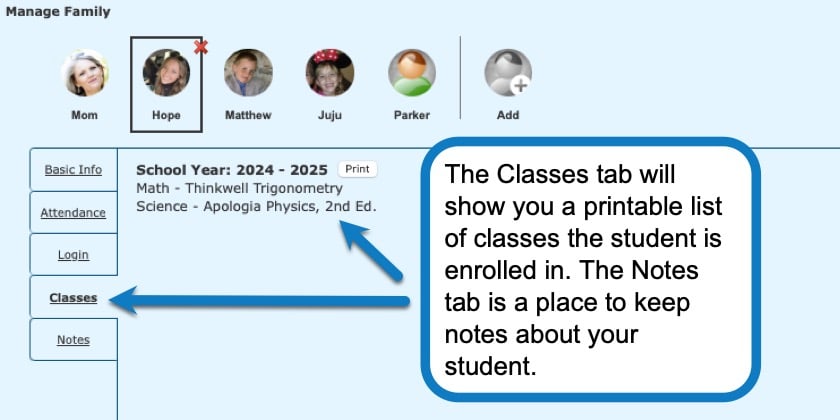
- A window titled “Manage Family” will open where you can put in your student’s information.
- The first tab is for Basic Info about your student.
First Name~ this field is required while all other fields are optional. This name is what will appear on your planner.
Last Name~ this field is not required but if you wish your student’s last name to appear on Report Cards, Transcripts, and other reports automatically you will want to enter it here. The last name will not appear on the calendar and planner views.
Grade~ select the grade your student is currently in. If this is for your spouse, a grandparent, tutor, or someone else who needs access to your account simply select the option “Not a Student” from the drop-down box.
Color~ Choose a color to associate with all this person’s activities, events, and assignments.
E-mail address~ by adding an email address you will be able to send emails to this person from within Homeschool Planet. Additionally, you will be able to choose to send Daily and Weekly Digests directly to users.
Cell Phone Number~ Adding a cell phone number will allow you to send reminders via text message, messages using the Messages widget, and to send them To Do Lists and Shopping lists.
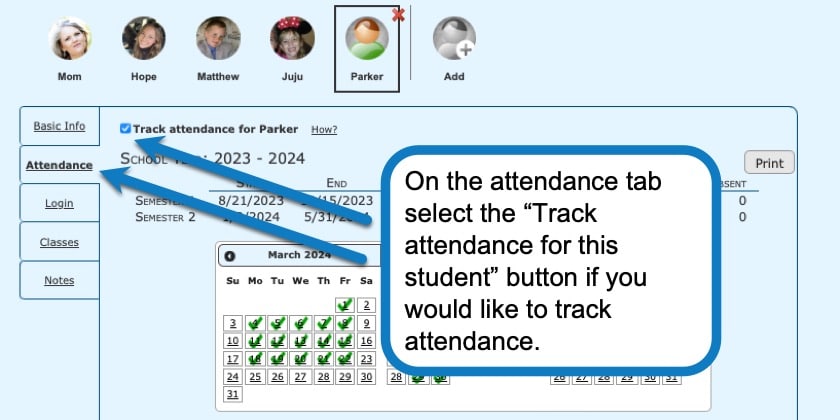
Photo~ Upload a photo to personalize your student’s account. We have found that most students LOVE seeing themselves in the planner. We have seen some really fun cartoons and memes in this field as well! Be creative and inspire creativity! - The next tab is Attendance. For information on setting up attendance tracking, recording attendance, and printing attendance select each link to go directly to instructions for those features.
- The final tab is titled Login.
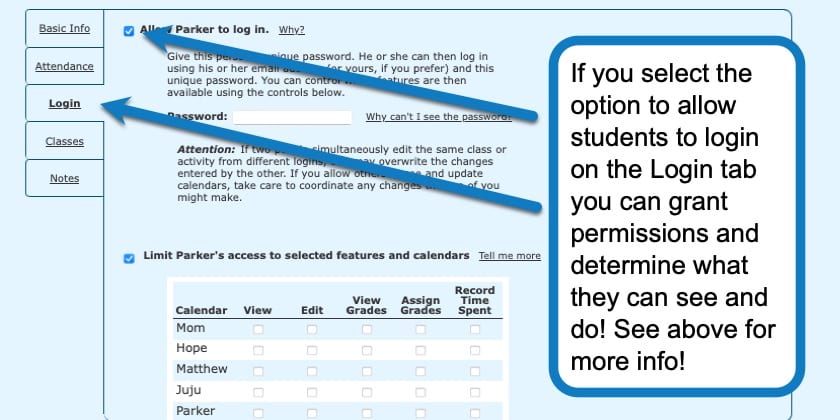
~ Selecting the option to, “Allow ((student name)) to log in” will allow students, or other users, to have their own login to Homeschool Planet.
~ Once you have enabled login for a user, enter a password for them. The email used to login will be the one you entered in the Basic Info section, above. If you did not enter an email in the Basic Info section, the email used for login will be the primary email associated with the account. Please note that you CAN use the same email for both the primary account and additional accounts but the individual user accounts MUST USE DIFFERENT PASSWORDS, so that the system can differentiate between users.
~ The default for users with a login is that they have full access to all user’s calendars and their own. If you would like to customize what a user sees select the checkbox which reads, “Limit ((student’s name)) access to selected features and calendars.” Next select what calendar items you would like available to the user for each person in the account. The categories are as follows:
View~ this lets a user simply see the calendar assignments, activities, and events for a person.
Edit~ selecting this option lets a user assign, edit, or change assignments, activities, and events for a person.
View Grades~ if grades are assigned to a class they can be viewed when this is selected.
Assign Grades~ changing and assigning grades for a user is available if this choice in checked.
Record Time Spent~ when time tracking has been turned on this option allows people to enter time to be recorded.
~Lastly, you can choose whether to allow the user to see and update widgets. - Finally, select “Save and Close” to save all the selections you have made for a user.
There are many possibilities for login options but following are a couple common login scenarios~
~ A young student may be allowed a login under their parent’s email, with their own password, but would likely have settings enabled to only see their own assignments and activities with no other privileges.
~ An older student may be allowed to login with their own email, view their calendar and grades, edit their widgets, but not have editing access to their classes or grades.
~ An older sibling who is a student but also teaches younger siblings may be able to view their own calendar and record the time they spend on activities, as well as view their siblings schedules and also be allowed to edit assignments, assign grades, and record time spent for their siblings.
~ A tutor may have a login and limited access to just the students they work with.
Adding Users and Logins Screenshots
Student User Video Tutorial
As always, feel free to reach out to us with any questions at support@homeschoolplanet.com. We are here to help you!
For more information about setting up your Homeschool Planet account see the following entries:
- Setting Up a School Year
- Setting Up Your Family Profile
- Adding a Plug-in Lesson Plan
- Setting Up Attendance Tracking
- Setting Up Hours Tracking
Not a Subscriber yet? Check out Homeschool Planet for yourself with a 30-day FREE trial. No credit card information is necessary to give it a try!

With Homeschool Planet lesson plans, homeschooling has never been easier!


