How Can We Help?
Adding Events
Want to make your life easier? Adding Events to your Homeschool Planet account gives you the ability to see the entirety of your schedule in one place. Learn the simple steps to adding events in this User Guide entry.

What Kinds of Events Can I Add?
You can add just about any event to your Homeschool Planet calendar! Here are a few examples of commonly added events found on a Homeschool Planet Calendar~
- Birthdays
- Anniversaries
- Vacations
How to Add an Event
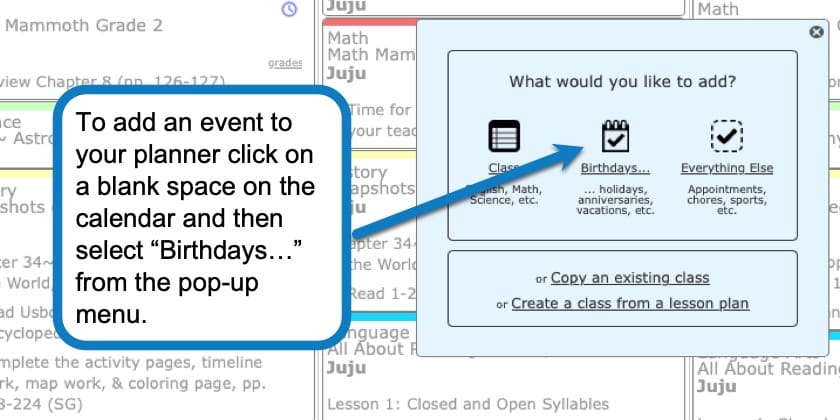
- After logging into your account, click on a blank space in your calendar, then select the “Birthdays…” option.
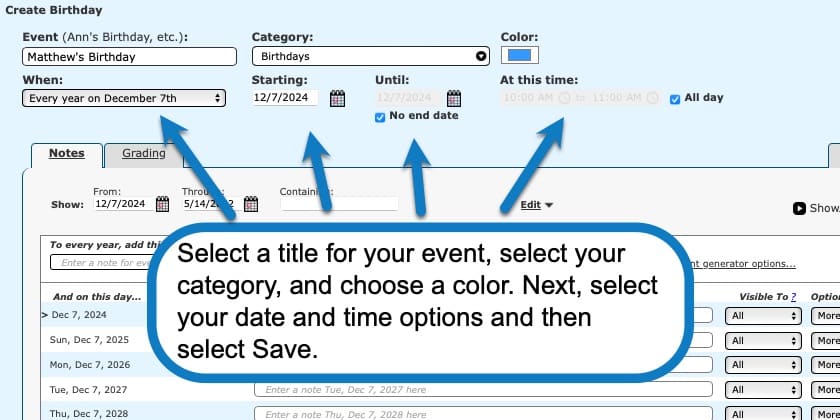
- In the “Create Birthday” window (which can be for any event, not just birthdays), give a name to your Event.
- Next use the drop-down menu in the “Category” field to select the category you need or select “Add a Category” if you want a new category.
- Select a color from the Color field if you would like a different color than the default for the Category you selected.
- Next, you will want to determine the time frame for your Event using the drop-down menu for the “When” field. The default is that the event will occur annually on the date it is applied to the calendar but there are quite a few preset options as well as a “More choices” option for creating a customized schedule.
- Set a start and end date for your event if you do not want them to follow the pre-selected default of No end date.
- Choose whether this is an All day event or in a specified window of time.
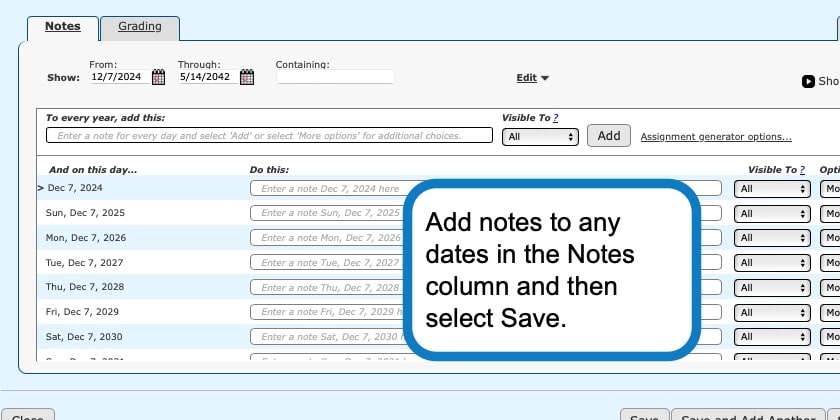
- Next go to the Notes tab and enter any additional needed information. You may use the “To every day/week, add this:” field to enter the same info, such as a location or other pertinent information, to each day this activity occurs.
- You can upload documents, add convenient reminders, or link to websites if needed.
- That’s it! Select Save & Close!
Adding Events Screenshots


Adding Events Video Tutorial
As always, feel free to reach out to us with any questions at support@homeschoolplanet.com. We are here to help you!
Check out these other entries about Activities you can add to your planner:
- Adding an Activity
- Adding Appointments
- Adding Birthdays
- Adding Chores
- Adding Community Service Hours
Not a Subscriber yet? Check out Homeschool Planet for yourself with a 30-day FREE trial. No credit card information is necessary to give it a try!

With Homeschool Planet lesson plans, homeschooling has never been easier!


