How Can We Help?
Adding a Class
This entry is designed to teach you the basic steps needed to add a class once you have set up your school year and added students. Directions for selecting options in this process are below.

Adding a Class Directions
- After logging into your account, click on a blank space in your calendar, then select the “Class” option.
- In the “Create Class” window, use the drop-down menu in the “Subject:” field to select the subject or to “Add a Subject.” Next, fill in the title field. Use the “For Whom:” drop-down menu to select your student(s).
- Next, you will want to determine the time frame for your class using the drop-down menu for the “When” field. There are quite a few preset options as well as a “More choices” option for creating a customized schedule. Here are the steps for creating a customized schedule:
- Select the “More choices” option in the drop-down menu which will open the “Edit custom schedule” window.
- In the “When” drop-down menu, select “Custom schedule…” at the bottom of the list.
- When this option is select, you will be able to choose a repeat pattern, specific days, and times. To the left of these fields, you will also be able to set the “Starting” and “Until” dates.
- When you are satisfied with your schedule selections, click the “Save” button in the bottom
- Set a start and end date for your class if you do not want them to follow the pre-selected defaults.
- Decide if you would like this class to occur at a particular time or no particular time and make the appropriate selection.
- Choose Save.
Assignment Creation Options:
-
- Enter single assignments for each day
- While in the Assignments tab, type in the task or assignment in the “Do this:” space next to the proper date.
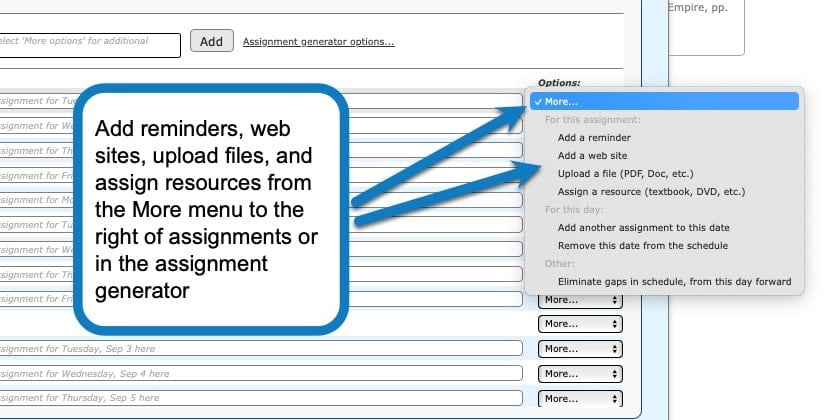
- See our other entries for utilizing the More… drop-down menu to the right of the assignments.
- As with any software connect to the internet, we recommend selecting Save after every few entries.
- When you have finished your entries select Save and Close from the lower right hand corner.
- Same assignment every day
- On the Assignments tab, in the “Show” fields, select your “From:” and “Through:” time frame for the repeating assignment.
- Below the “Show:” section, locate the “To every class day, add this:” field and enter your information.
- Select the “Add” button and a confirmation window will open. Review the information, select the appropriate button to either fix or make them all the same. If you are happy with your plan, select the “Yes, make them all the same” option, and another confirmation window will open. Review the information in this window, then select the “OK, add them” button.
- Simple reoccurring pattern (Lesson 1, Lesson 2, Lesson 3, etc.)
- Follow steps 1-3 above except when entering your information in the “To every class day, add this:” field, add the braces {1} with information such as a number or a letter in them after your leading text (Lesson {1}). This tells our system to generate assignments in sequential order (ex: Lesson 1, Lesson 2, Lesson 3, etc…).
- Complex reoccurring pattern
- In the “Assignments” tab, to the right of the entry space for the “To every class day, add this:” field you will see the “More options…” text link. Select this link to open the “Assignment Generator.”
- In the “Assignment Generator” window you will see several options to choose from to auto-create your assignments. Select the best option to fit your needs then click the “Next” button.
- In the next window, fill in the date fields and other relevant information, depending on which option you selected in step 2. Click the “Next” button.
- In this window, you will enter the information for your assignments in the “Do this:” section. There are specific instructions for this at the top of the window.
- Be sure to keep the braces {1} for our system to create the sequential pattern.
- A preview of your assignments will populate below.
- Make changes to your assignments until they appear the way you want them to in the preview section.
- Once you are happy with how everything looks in the preview section, click the “OK” button in the lower right-hand of the window.
- Enter single assignments for each day
After following the steps for one of the options above, the reoccurring assignments will now be in the assignments tab. At this point, you should select the “Save” button in the lower right-hand corner of the window to ensure your work will not be lost.
You can fine-tune your assignments by adding resources, additional reminders, and more, by using the “More…” drop-down menu in the “Options:” column. You can also add notes to your schedule on the “Notes” tab in a similar manner as creating assignments.
When you are completely satisfied with your assignment set-up, click the “Save and Close” option in the lower right-hand corner of the window and the reoccurring assignments will be applied to your planner.
Adding a Class Screenshots


Adding a Class Video Tutorial
As always, feel free to reach out to us with any questions at support@homeschoolplanet.com. We are here to help you!
For more information on setting up and using Classes in your Homeschool Planet account see the following entries:
- Lesson Plan or Class?
- A Word about Subjects
- Deleting a Class
- Editing a Class
- Changing a Class Schedule
- Changing the End Date of a Class
- Copying a Class
- Adding a Field Trip
- Classes on Different Days and Times
- Classes with More than 1 Student
- Adding an Extra Day to a Class Outside Usual Schedule
- Calendar View: 5 or 7 Day Week
- Setting Up Subjects
Not a Subscriber yet? Check out Homeschool Planet for yourself with a 30-day FREE trial. No credit card information is necessary to give it a try!

With Homeschool Planet lesson plans, homeschooling has never been easier!
![]()