How Can We Help?
Create a Lesson Plan
Whether you’re a homeschooling veteran or a newcomer, crafting effective lesson plans is essential for staying organized and keeping your students on track. In this article, we’ll walk you through how to create a custom lesson plan, from basic steps to advanced features.

Create a Lesson Plan
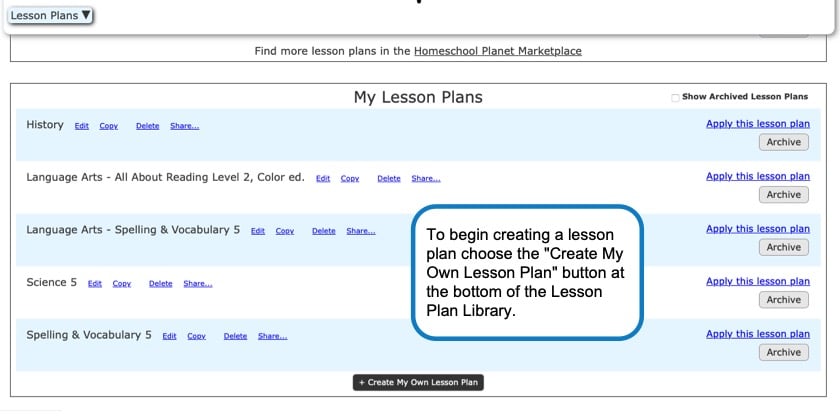
After logging into your account, click on the drop-down menu labeled “Calendar” in the upper left-hand side of your screen and choose the “Lesson Plans” option. At the bottom of this page, you’ll find an option to Create My Own Lesson Plan. Click on this button to start building your lesson plan.
You will be prompted with a pop-up that explains some key features of the platform. If you prefer not to see this message each time, you can select the option to hide it in the future.
Step 1: Name Your Lesson Plan
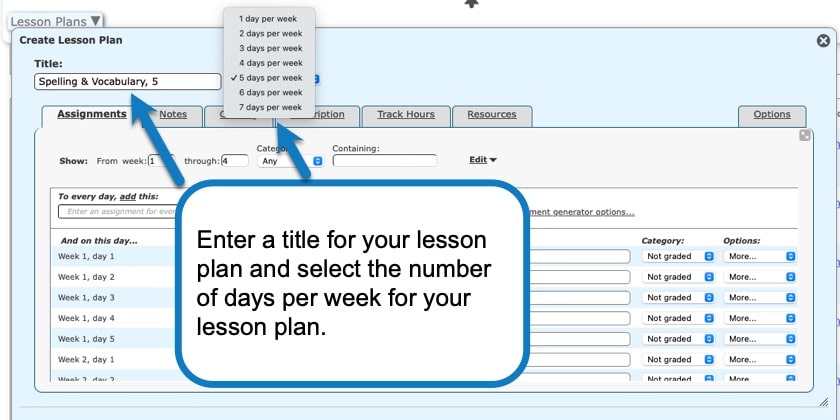
The first step is to give your lesson plan a title. For example, let’s say you’re creating a Spelling and Vocabulary plan for your student. You might name it “Spelling and Vocabulary 5.” The title should be clear and specific to the subject and grade level you’re planning for.
Step 2: Set the Frequency of the Plan
Next, decide how many days a week you want the lesson plan to run. You can choose between 1 to 7 days per week. For this example, let’s assume you’re planning for 5 days a week, since you want your student to work on spelling and vocabulary every weekday.
Step 3: Add Assignments
This is where things get interesting. You can either add assignments manually for each day or use the assignment generator to automate the process.
Manual Entries: You can create specific assignments for each day of your lesson plan. To do this simply add the assignment(s)to the day you would like them scheduled on. A few tips for adding manual assignments~
- This is a text field and as such it takes text only. If you enter images in this field your lesson plan will likely encounter difficulty with saving.
- You can type in the assignments directly or copy and paste from a document.
- Each box will create a new assignment checkbox. If you have multiple assignments for a single day click more (found to the far right of the day’s assignment box and then select “Add another assignment to this date” to add another assignment entry.
- You can also add an additional assignment box to a day when holding down the control key and hitting return/enter on your keyboard.
Automated Assignment Generator: If you prefer a more automated approach, Homeschool Planet offers an assignment generator. This tool allows you to set recurring patterns for assignments, such as weekly spelling quizzes or vocabulary word lists. The Assignment Generator is a powerful tool with many options. Learn all about the Assignment Generator in our User Guide entry, Assignment Generator.
Step 4: Customize Notes:
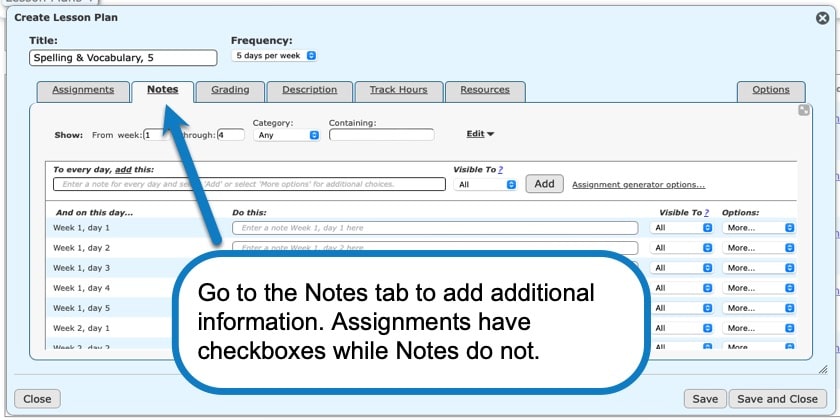
You can add notes at the top of each lesson plan page, which will appear as helpful reminders and further information for both you and your student. To add a note to an assignment select the tab “Notes” found to the right of the “Assignments” tab you started on. The User Guide entry, Notes, will provide more information about this process.
Step 5: Add Grading and Resources
After you’ve set up the basic structure of your lesson plan, it’s time to think about grading and resources.
Grading Categories: You can add grading categories like “Homework” or “Test,” and assign percentage values. For example, you might give 40% weight to homework (e.g., daily practice), 20% to projects, 10% to quizzes, and 30% to tests. Learn about all your grading options in the Grading User Guide entry.
Adding Resources: You can enhance your lesson plan with extra resources, such as links to websites or PDFs and documents. If you want your student to reference a particular site for research, you can easily add a website link directly using the More menu found to the right of your assignment box. This saves you time and provides the student with immediate access to relevant materials. You can add page numbers, labels, or even adjust how the resources appear. This helps ensure the lesson plan is clear and easy to follow.
Step 6: Review and Save Your Plan
Your lesson plan does not automatically save so be sure to hit the save button periodically as you are working on your lesson plan. Then, once you’ve entered all your assignments, resources, and grading details, take a moment to review everything. Make sure the lesson plan looks just the way you want it. When you’re satisfied with the setup, click Save and Close. You will now find your completed lesson plan in the “My Lesson Plans” section of the Lesson Plan Library. Homeschool Planet allows for flexibility. You can always come back to make adjustments if something needs tweaking, such as adding new assignments or changing the grading scale. You can access (and edit your plan further) at any time by choosing the Edit button next to the name of your lesson plan.
See the Video tutorial below for more in-depth help!
If you run into any issues or need help optimizing your plan, Homeschool Planet’s support team is just a click away. You can contact them directly via the Help menu of your planner or by emailing us at support@homeschoolplanet.com.
Create a Lesson Plan Screenshots:


Create a Lesson Plan Video Tutorial:
As always, feel free to reach out to us with any questions at support@homeschoolplanet.com. We are here to help you!
Here are other actions to take when just getting started using your Homeschool Planet planner:
- Setting Up Your School Year
- Create Family Profiles
- Add an Integrated Lesson Plan
- Customize Your Background Theme
- Setting Up Attendance Tracking
- Tracking Class and Activity Hours

Not a Subscriber yet? Check out Homeschool Planet for yourself with a 30-day FREE trial.
No credit card information is necessary to give it a try!


