Skip to main content
How Can We Help?
Adding Shared Assignments
Isn’t it the best when two students can take the same class? This tutorial will show you how to create a class, or activity, where more than one student completes the same assignments.

Adding Shared Assignments in a Class
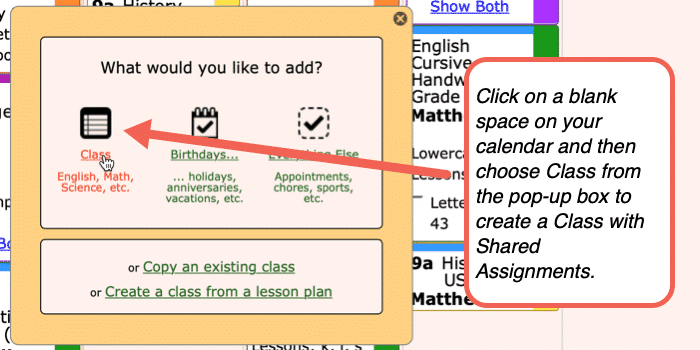
- After logging into your account, click on a blank space in your calendar, then select the “Class” option.
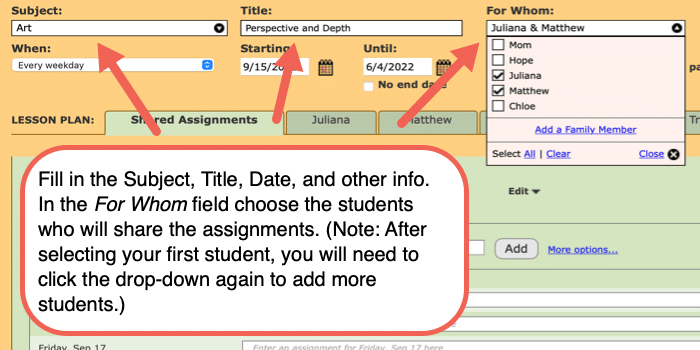
- In the “Create Class” window, use the drop-down menu in the “Subject:” field to select the subject or to “Add a Subject.” Next, fill in the title field if you would like.
- In the “For Whom:” field, use the drop-down menu to choose the students who will share these assignments. (Note: After selecting your first student, you will need to click the drop-down again to add more students.)
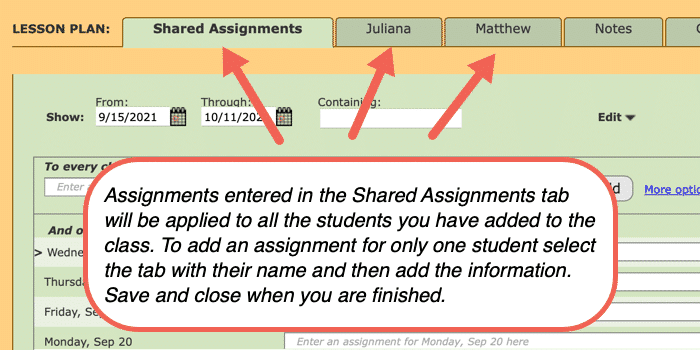
- Once more than one student has been selected, you will see a “Shared Assignments” tab below as well as tabs for each student you have chosen.
- Fill in the remaining fields in the upper section (when, date range, and time).
- You are now ready to enter the assignments in the “Do this:” fields. Please note the following:
- Assignments entered in the “Shared Assignments” will be applied to all the students you have selected.
- If you would like to create an assignment for only one of your students, select the tab with their name, then add the information there. This assignment will apply to only this student and will not be shared.
- Once you have finished entering your information, select the “Save and close” button in the lower right corner of the window.
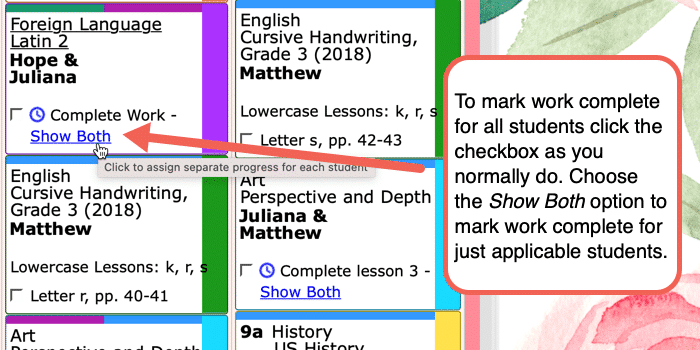
- Your newly created class will appear on your calendar/planner. In addition to the assignment information, you will also see the names of the students who share the assignment.
Marking assignments complete options:
- If you want to mark assignments complete for all students, you can click the assignment checkbox as you normally do for non-shared assignments.
- If you need to mark a specific student’s assignment(s) as complete, select the Show Both link. When you click this link, a new window will open revealing all the students’ names who share the assignment. You can check the box here for the applicable student(s).
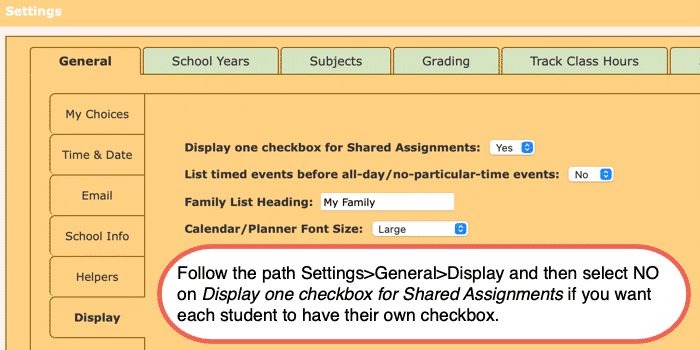
- If you would like to see individual checkboxes for all your students all the time:
- Select the “Settings” option in the upper right of your planner, then choose the “General” option.
- When the “Settings” window opens, locate and click the “Display” tab.
- In the drop-down menu for the “Display one checkbox for Shared Assignments,” select ‘No”
- Click the “Save” button in the lower right of the “Settings” window.
- When your calendar/planner reloads you will now see checkboxes for all students who share an assignment.
Adding Shared Assignments Screenshots
Adding Shared Assignments Video Tutorial
As always, feel free to reach out to us with any questions at support@homeschoolplanet.com. We are here to help you!
For more User Guide entries about Assignments, please see the links below:
- Assignment Generator
- Rescheduling Helper
- Assignment Lists
- Adding an Additional Assignment to a Day
- Same Assignment Every Day
- Creating Multiple Assignments per Day
- Adding Notes to Assignments
- Adding a Reminder
- Checking Off Future Assignments
- Delete an Assignment
- Delete Multiple Assignments
- Editing Assignments
- Hide Completed Assignments
- Meaning of Colored Checkboxes
- Marking Several Assignments Complete
- Moving Assignments
- Assignments Not Showing Up in Digests
Not a Subscriber yet? Check out Homeschool Planet for yourself with a 30-day FREE trial. No credit card information is necessary to give it a try!

With Homeschool Planet lesson plans, homeschooling has never been easier!


